I have gone to great pains to keep this as simple as possible. Because of this, some of these positions can not be reached in a real game. Instead I want you to realise the idea.
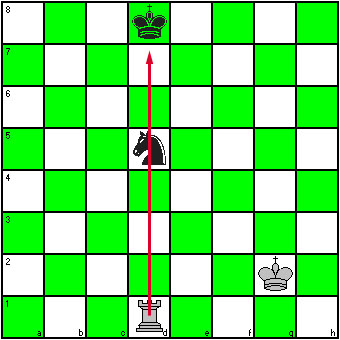
The first pin we are going to check out is the so called basic pin. Look at this example:
In this example the Knight on d5 can not move at all. If it moved the black king would be in check, and this is illegal. This may be obvious but you can not even go to e3 forking the white king and rook. Even though the knight delivers check at e3, it fails to answer the check at d8.
The Queen, Rook or Bishop can all create a pin.
Technical terminology: This is a full absolute pin. Full because the knight has no legal/safe moves at all. Absolute because the knight is pinned against the king.The relative pin occurs whenever the piece is not pinned against the king. This is opposed to the absolute pin.
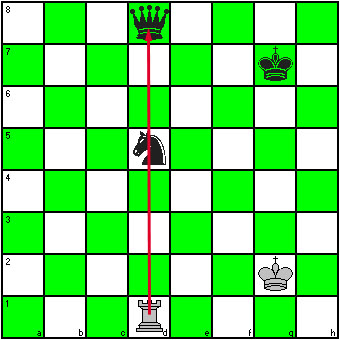
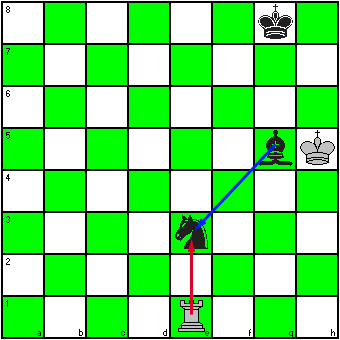
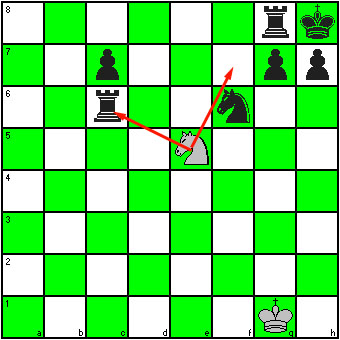
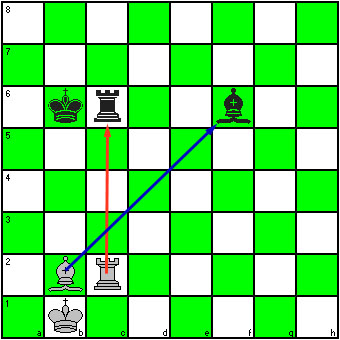
In this example if the knight moves, the rook can take the queen. But it is not illegal to move the knight. Black can move Nf4+ (knight to f4 check), after the king moves the queen can take the rook for free. Better yet is Ne3+, then taking the rook with the knight.
A Queen, Rook, or Bishop can all create a relative pin.In this pin, the pinned piece still has legal/safe moves.
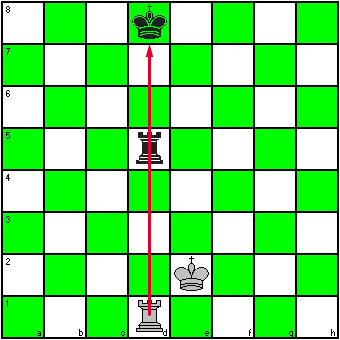
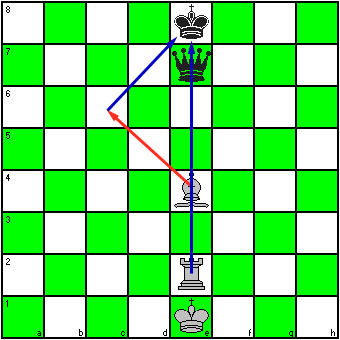
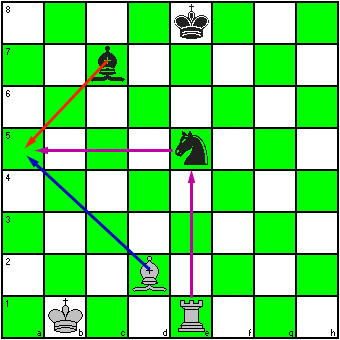
Though blacks rook is pinned to the king, it can still move. It can go anywhere along the d-file including taking whites rook or retreating to the protected square d7. It can not go to e5 or anywhere else along the 5th rank as this would leave blacks king in check.
A Queen, Rook, or Bishop can all create a partial pin.This kind of pin tends to be sneaky. It is very easy to overlook this tactic, especially if it is two or three moves away.
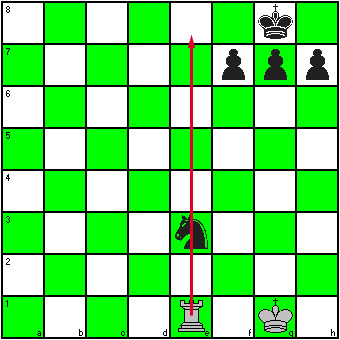
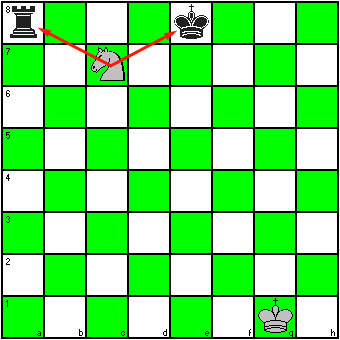
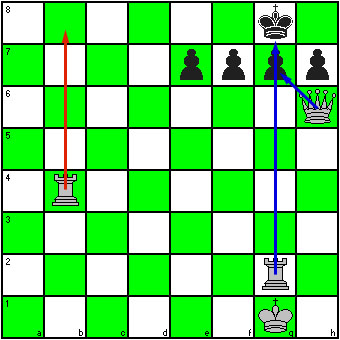
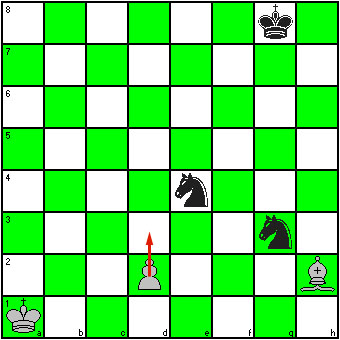
In this example, blacks knight is pinned to the threat of checkmate. If the knight moves then the rook will go to e8 and white wins the game.
A Queen, Rook, or Bishop can all make a pin to a threat.
This is a bit different then the other pins. This is not really a tactic but a liability.
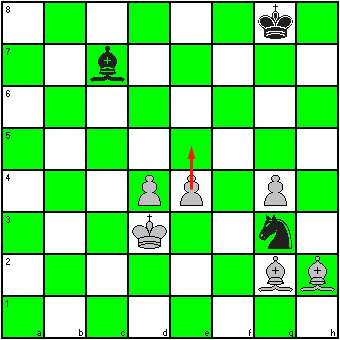
Here the bishop is pinned to the defence of the knight. The bishop has to be careful where to move or the knight is lost. This is a partial pin as the bishop still has safe moves. This occurs often but is usually only used to describe a position where the defender wants to move for one reason or another.
Any piece can be pinned to the defence.
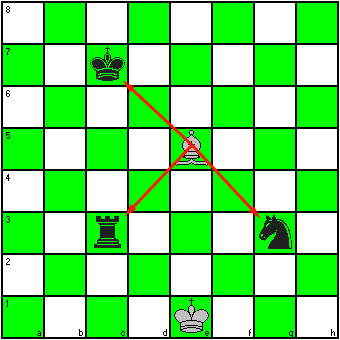
The skewer is the opposite of a pin.
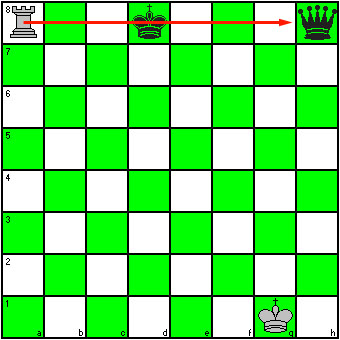
In this skewer the rook forces the king to move, revealing an undefended queen.
The Queen, Rook, or Bishop can all create a skewer.
Discoveries occur when you move one piece out of the way to reveal an attack by another.
The fork is a kind of double attack where a single piece attacks two pieces simultaneously.
Here the knight is attacking two pieces. Black must save the more valuable piece (king) and lose the other.
Any piece can fork, but the knight is often the best at it.Just like pinning to a threat, this tactic is sneaky.
In this lovely example, the white knight forks the c6 Rook and check mate at F7. (smothered mate) It is also possible to fork two or more squares/threats and no pieces.
Any piece can fork a piece and a square.A royal fork is one where the King and the Queen are forked.

A Family Fork is when there are more then two pieces forked at the same time.
Double attacks include forks, however we are going to look at double attacks involving more then one piece.
A double check is nasty because the only way to answer it, is to move the king.
White would like to take the bishop, but the rook defends it. What do you do?
Here the goal is to get blacks defender to leave the defence.
The idea is to make the defender move away or be captured.
If you block the defender, it is no longer defending.
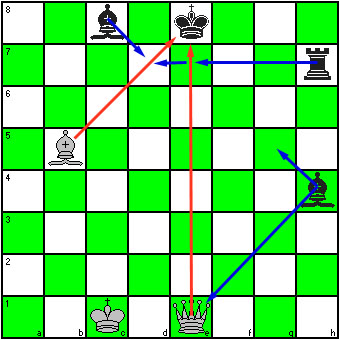
This move is among the coolest in chess. Black threatens mate Qa1++ (Queen to a1 mate). Black has overwhelming piece majority. WHAT DO YOU DO?
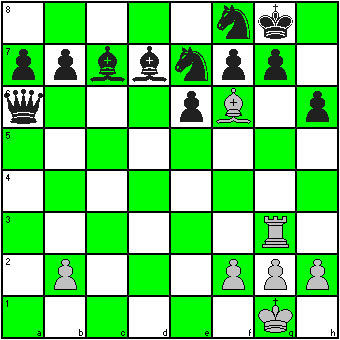
The answer is perform a windmill. Sorry no arrows, this one is just too
complicated.
1. Rxg7+ Kh8 << Rook takes g7 pawn, black has only
one legal move.
2. Rxf7+ Kg8 << Rook takes f7 pawn, black has only one
legal move.
3. Rg7+ Kh8 << Rook comes back to g7, black has only one
legal move.
4. Rxe7+ Kg8 <<Rook continues to go back and forth wiping
out blacks army.
5. Rg7+ Kh8
6. Rxd7+ Kg8
7.
Rg7+ Kh8
8. Rxc7+ Kg8
9. Rg7+ Kh8
10. Rxb7+ Kg8
11. Rg7+ Kh8
12. Rxa7+ Kg8
<< This time, the Rook doesn't go back.
13. Rxa6 << Black looses his Queen and his mate threat. White
should win easily from here.